


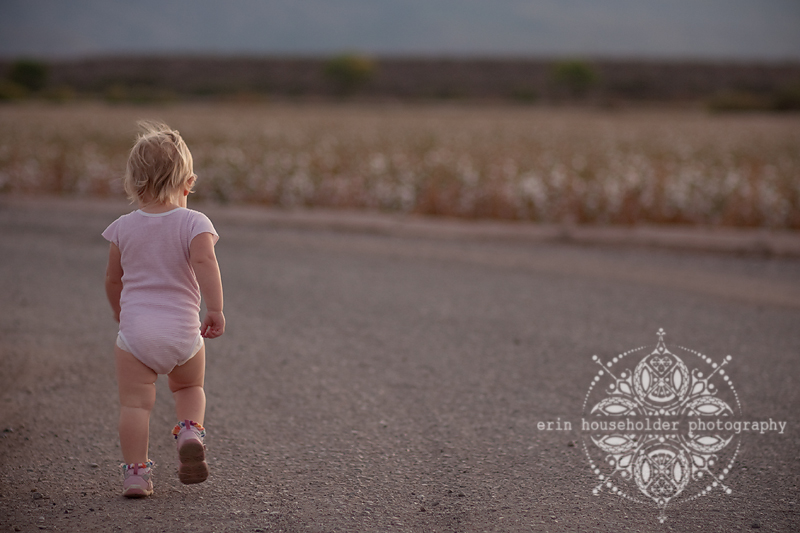
Before (SOOC)
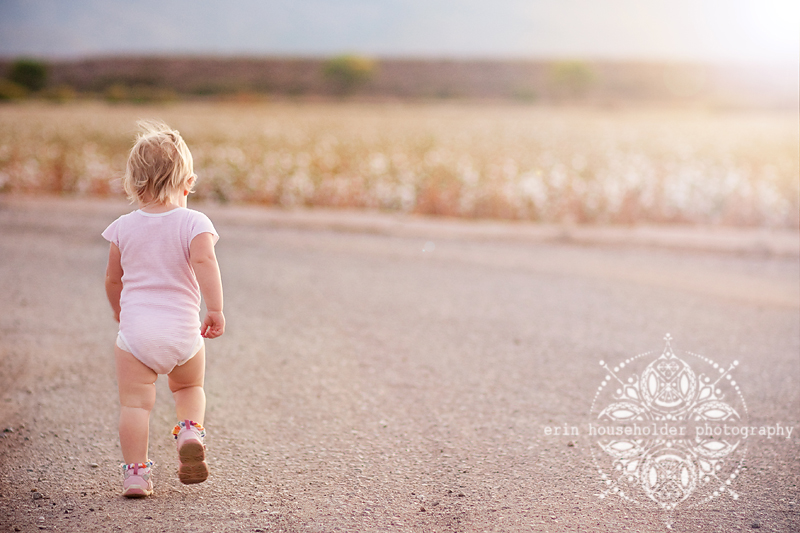
After
My steps (if you are confused about some of the wording or tools I use in my processing, Google is your best friend!):
1. Pulled up the exposure, added contrast, and added a slight vignette in Adobe Camera Raw. Because the sun had just barely set, the original photo was very dark. I think my ISO was set to 250. I could've bumped it up a little to avoid the under-exposure.
2. Did a slight S-curve in Curves to add contrast and brighten midtones.
3. Used layer masks to erase contrast from skin at 90% opacity.
(Side note: contrast is NOT good for skin tones. Usually makes them orange and very harsh looking).
4. Added some sun flare to the right corner. The picture was taken after the sun had gone down, but I wanted to make it look as if the sun was just setting. Sometimes I like to fake it :)
5. Used the Sponge tool at 15% opacity to bring out depth and color of the gravel and cotton field.
Before (SOOC)

After

I already liked the SOOC a lot, but it needed a little bit of a pop.
My steps:
1. Lifted exposure and added contrast in Adobe Camera Raw.
2. Used the Color Balance tool to even out skin tones.
3. Did a selective lightening using Curves to brighten up dark shadows on his face. It's a complicated process, but if you want to know how to do it, email me and I'll send you a link to a tutorial.
4. Used an action that I love... Stacey Bishop Workflow... google it.
When using actions, make sure that you adjust each layer to fit the image that you are working on. Yes, actions are great... but they can go from good to bad to worse so quickly and if your eyes aren't trained then you may not know that you have a problem.
As you can see, post processing is so important in digital photography. There's so much that you can do in photoshop and other more advanced editing programs. That said, just because you CAN do it, doesn't mean you always SHOULD. I've definitely had to learn this the hard way. It's so easy to over-process when you're first starting out. I do tend to prefer the extremely processed look... just my personal style. However, I am trying to learn how to find a happy medium.
I hope this helps someone out there! Please feel free to send any questions to erinhouseholderphotography@gmail.com and I'll do my best to get a tutorial posted for you.
Thanks for sharing your before & afters. I learn so much just by looking at before & afters and seeing what is possible. I wonder if sun flare is something Elements just doesn't have. It has lens flare, but no sun flare. Or did you create the sun flare yourself using some lightening tools? Also, I absolutely love Stacy Bishop's site. Thanks for sharing! You're amazing!
ReplyDeleteNevermind about my sunflare question. I think I figured it out. Thanks again!
ReplyDeleteawesome transformations. the sun flare is TOTALLY believable! I still don't know how to do that. I should look it up.
ReplyDelete